Firefly on a Shoestring

Standard

My friends and I are firm believers that if you have a costuming niche, you should totally exploit it use it your benefit. A great example was this amazing Scotty at DragonCon:

Even though this picture is from 2011, he was at DragonCon again this year, and he looks exactly the same.
Picture from http://www.wingedmammal.com

I, of course, have my Asian niche. I do try to branch out sometimes and try non-Asian characters (they are costumes, after all), but people are always less confused when I’m an Asian character.

My husband’s niche is Nathan Fillion. He really does have an uncanny resemblance to him. He’d gone as Captain Hammer the last two years, so when our friend said she wanted to go as Zoe from Firefly this year (she’s got the Black female niche covered), I decided my husband had to be Mal.

From browsing some of the Firefly fan sites, I know that some hardcore Browncoats drop serious cash buying or making exact replicas of the costumes and props used in the show. I was just going for passable, though, so this is what I came up with.

20130830_170323

Pants:

The (mostly) authentic pants cost upwards of $50, so I found some khakis on clearance at Walmart for $7, ripped off the beltloops, changed the back of the waistband,  added jean buttons for suspenders, and added stripes down each side with brown grosgrain ribbon.

Image

The back of the waistband before finsihing and adding buttons

Suspenders:

I bought some replacement suspender ears with sew-on attachments off of eBay for a few dollars and made some suspenders out of brown bottomweight material (I couldn’t find canvas in the right color, and I didn’t feel like dying anything).
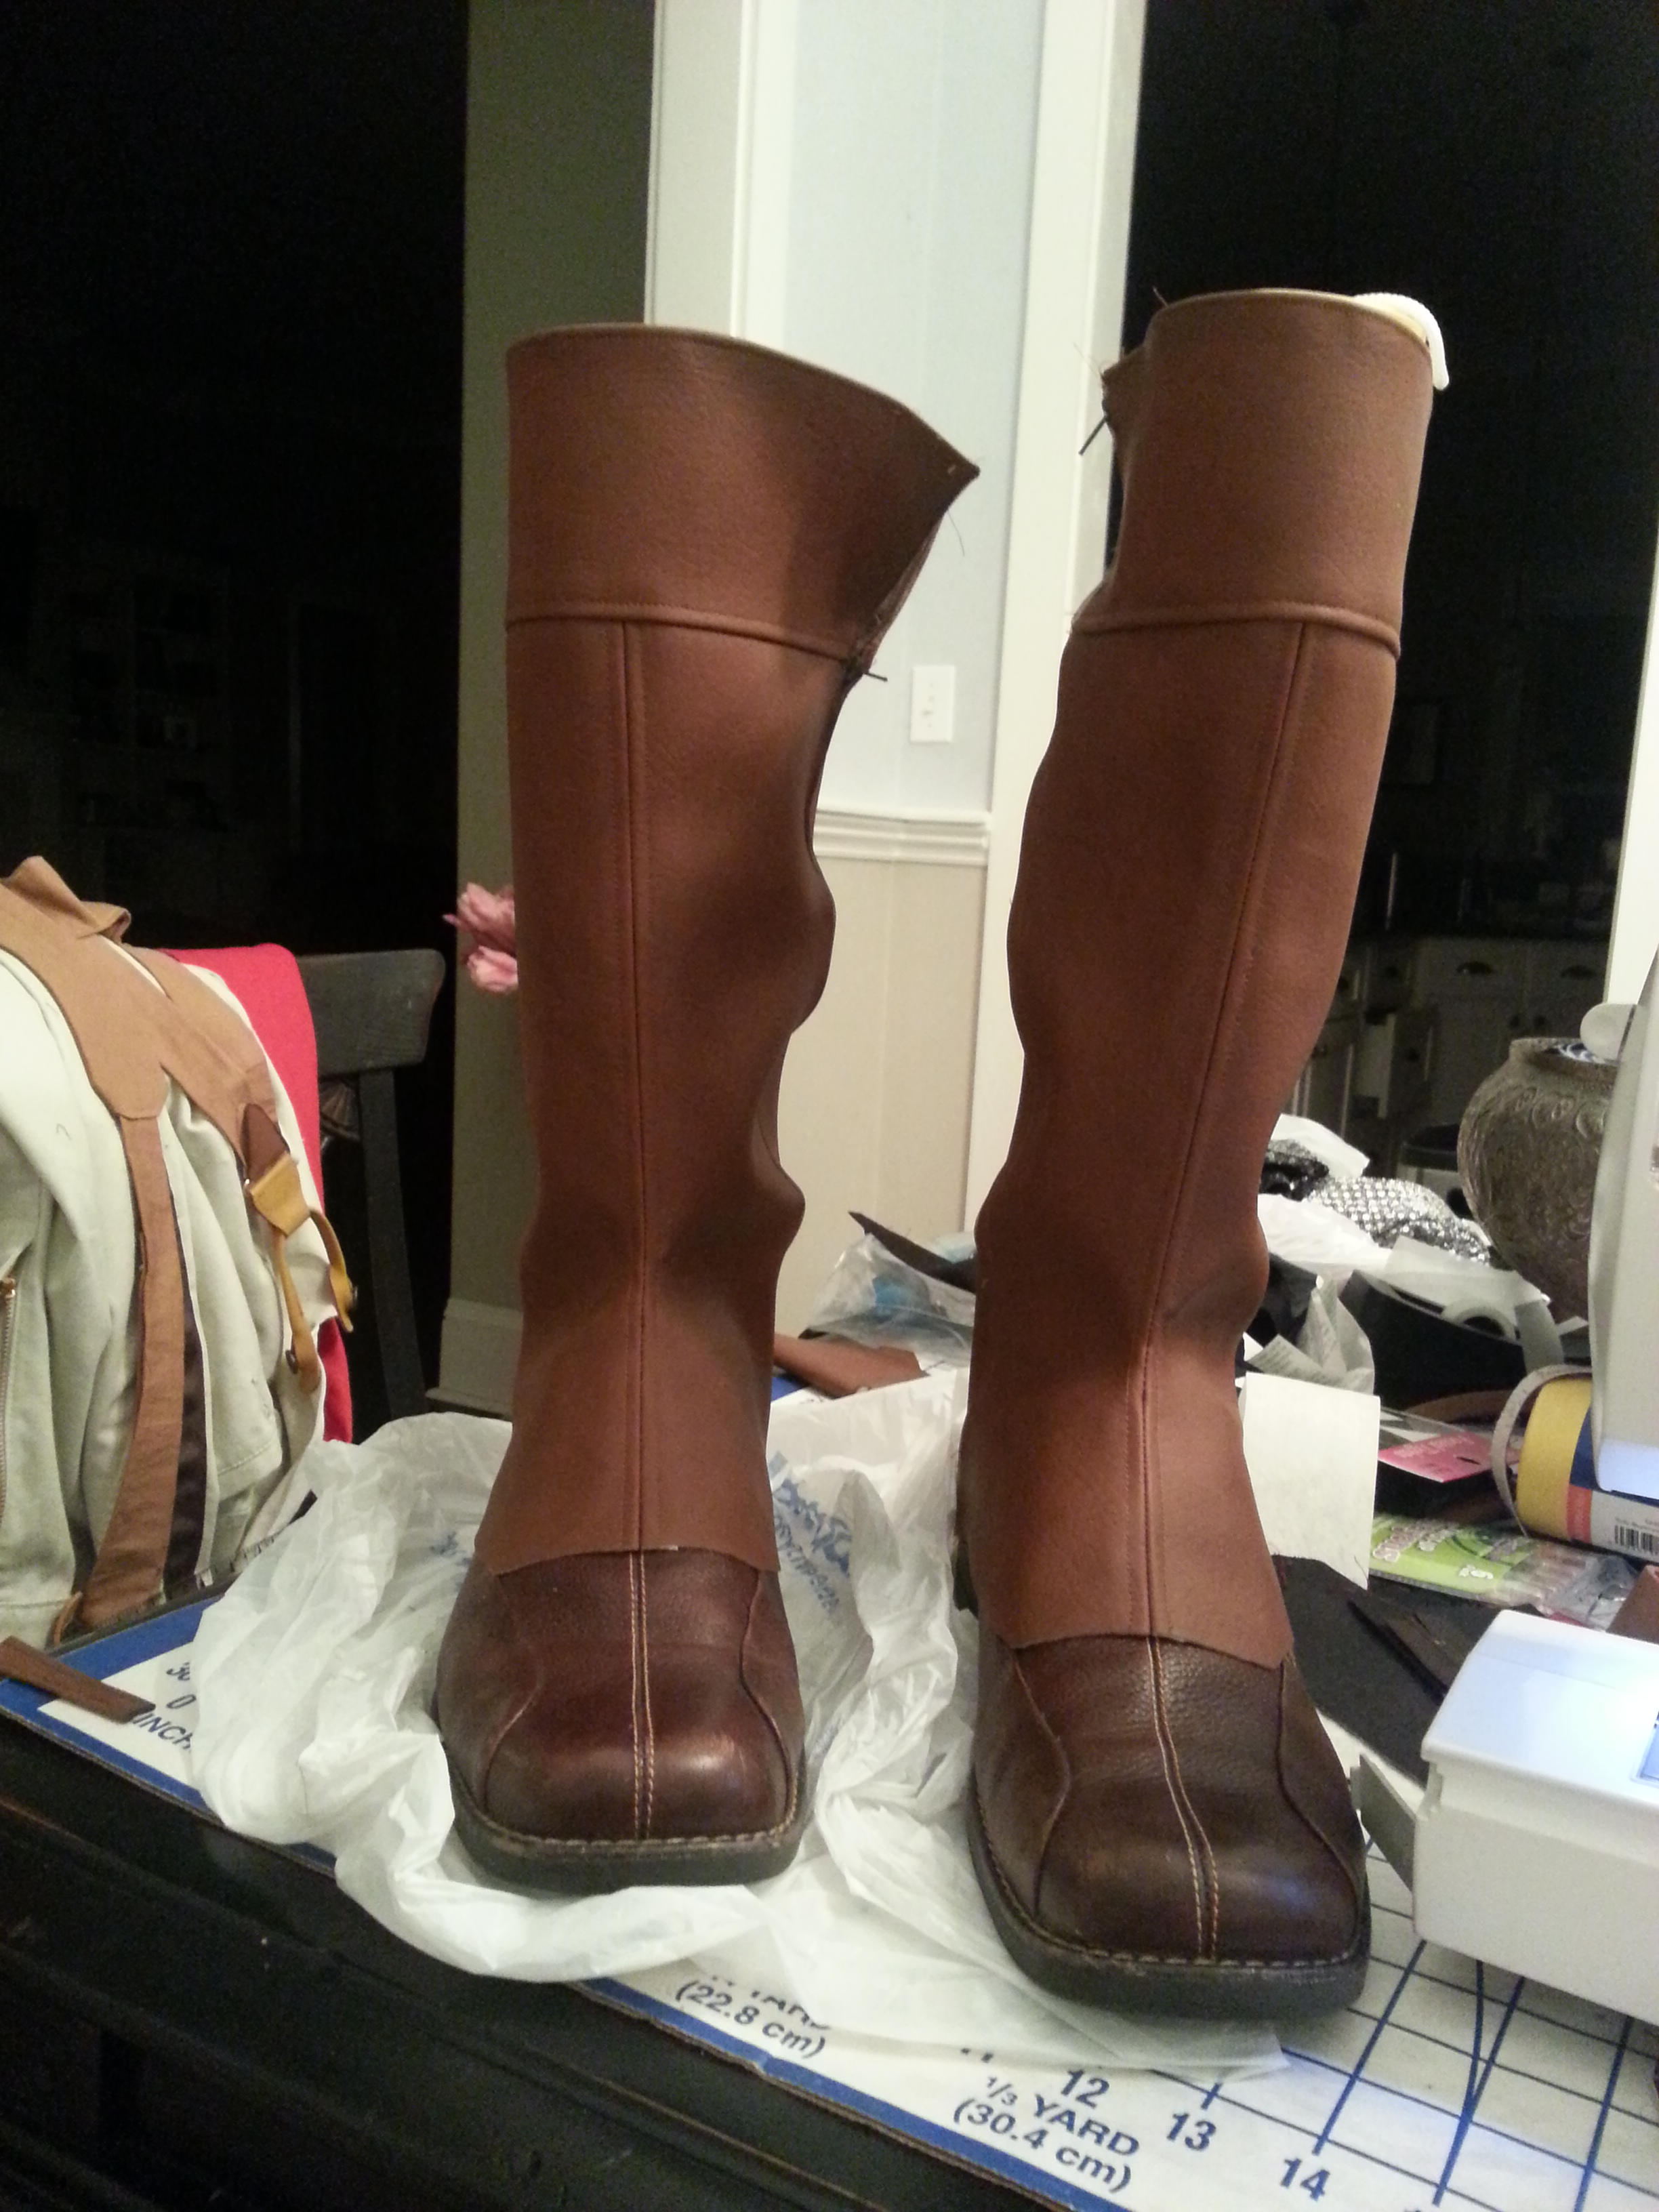
Boots:

Boots are expensive! While I can (sorta) justify spending money on boots for myself because I can wear them again, there is no place in my husband’s non-costume wardrobe for knee-high boots. I was looking around for cheap men’s boots to no avail when I learned that Mal’s actual boots from the show were just slip-on Steve Madden shoes with spats glued on to them. So my being cheap was actually leading to a more authentic boot! My husband happened to have a pair of brown shoes that he hated that were close enough to the Steve Madden shoes. I made spats out of brown vinyl and glued them on with rubber cement. I meant to paint/weather the vinyl to give the boots a more uniform appearance, but I never got around to it. Maybe next year.

The actual boots from the show

20130825_233503


Holster:

The holster was made with some leftover brown vinyl scraps, brass studs, and a sandal buckle (the same ones I use in Zoe’s costume below).  I coated the back of the vinyl with a layer of glue to stiffen it a bit. The back and edges of the vinyl are white, so I painted them with brown acrylic paint to make them look more like real leather.

20130815_202230

I also added a stud and snap to the trigger strap, but I didn’t get a picture

I also helped my friend with her Zoe costume.

Vest:

I happened to have the McCall’s M5800 pattern on hand, and the bodice had the right princess seams for Zoe’s vest.

M5800

image

This is before trimming and finishing the straps

I didn’t realize until after I already made the costume that the back isn’t exactly right (Zoe’s had one seam down the back instead of two princess seams), but I don’t think most people cared. I lengthened it a bit as the bodice was supposed to hit at the waist, and Zoe’s vest is a bit longer. I opened the two side seams and added four sandal buckles on each side (I found a pack of 20 for $5 on eBay!).

Holster:

The holster is basically a T with one side of the top arm longer than the other. I used a gold buckle that was leftover from another costume, so it’s not quite as big as Zoe’s, but it worked. I didn’t have a shotgun shell on hand, so I used a AA battery as a guide in making the bullet holders. In hindsight, I should have tried to get my hands on some fake bullets so that if she ever intends to put some in there they’ll be functionable. The real holster had a hook to hold the gun in place, but becasue my holster was not made of stiff leather, there was no way to put a functioning hook on. I sewed on a couple of straps instead, which means that in a gunfight, my Zoe would be shot before she could get the first strap unbuckled, but it looked fine.

 20130830_22391320130830_184756

Don’t Call Me a Cosplayer

Standard

Once again, I got too busy working on other things to post on this blog, but now that I’ve had a week to recover from DragonCon, here’s my review of the three costumes I made for myself this year.

My post-apocalyptic Mulan costume was the first one I wore this year. It was part of a group costume, and my friends went as Snow White and Belle. The Snow White costume was definitely the most recognizable out of the three, and I think I only had one person get who I was supposed to be when I wasn’t with her. I also don’t know if people really got the post-apocalyptic theme. At one point, someone referred to us a “bad-ass” Disney princesses, so we went with it for the rest of the day except for maybe my Belle friend, who realized she looked more like Angry Black Panther Belle.

20130831_153606

One of these days I need to pick a costume where it’s acceptable for me to just smile and look happy. I tried getting into character at first, but my attempts at looking bad-ass usually look and feel ridiculous. What can I say? I’m not a cosplayer. I’m a costumer who happens to wear her own work sometimes.

20130831_153031

Bad-assery FAIL.

That night, I changed into my Once Upon a Time Mulan costume because it was way too hot to wear during the day. Having worn the costume two nights now, I’ve learned that drinking alcohol in a tight-fitting quilted vinyl costume is a horrible idea. The costume was sweltering to begin with because vinyl doesn’t breathe. The alcohol made my body temperature rise even more. I almost passed out a couple times  the first night, and I only had it on a couple of hours. Luckily, I had brought a cooling towels and wore it under my neck and back, so that helped somewhat.

20130831_224408

PSA: Alcohol and vinyl don’t mix

I never did get any great pictures of this one. I got photoed a lot in this, thgough, so maybe someone else got a good shot. I haven’t seen any on the internet yet, but if you run across a photo, by all means, let me know.

20130831_222657

What I really loved about this costume was the conversations it sparked. Other costume-makers would stop me and ask what I made it out of, how I made it, etc. I got props from hard-core cosplayers and professional costumers. One person even told me it was the most intricate costume they’d seen there, which is saying a lot. I even got invited to a OUAT photo shoot. Unfortunately, I wasn’t able to make it. I hear there was another Mulan there, though, and I would have loved to have seen her take on the costume.

20130831_224534

20130901_224726

My last costume this year was the skant from the original Star Trek series which I made from the official pattern from Roddenberry.com. I’d heard that the pattern was “wonky,” and they weren’t kidding. The arms were so tight that by the end of the day, the crooks of my elbows were sore from rubbing. There’s also no room in the underarm area, so I could only move like a T-rex all day. I’d also been warned about how short the dress is. Even after adding an inch and a half to the hem, it was still ridiculously short.

Still, even though this costume took half the time of the post-apocalyptic Mulan and a tenth of the time it took to make the OUAT costume, I got my picture taken more in this dress in the first hour I wore it than the other two costumes combined. Of course, it also helped that I was part of a trio in Star Trek dresses.

20130901_190410

I’m going to attribute the popularity of this costume to the intense nostalgia of Star Trek fans rather than the obscene length of our skirts.

Throwing Down the Gauntlet

Standard

As always, I underestimated how much time it would require me to work on something. So, at the end of my last post when I said I’d be done in a week–that was a down right lie. At that point, I only had the gloves, the sleeves, and some finishing touches left. Since then, I’ve managed to finish the gloves less the aforementioned finishing touches (by “finishing touches” I mean little metal triangle button/shield/charm thingies that appear all over this costume and apparently are not sold anywhere).

It was a huge pain to find good pictures of the gloves, but this was the best I was able to come up with:

You can still barely see all the details.

The weekend I started working on the gloves, my parents happened to visit for the weekend. My mom, who is a seamstress by trade and taught me most of what I know about sewing, saw me working on the gloves and opined that gloves are “really hard to make” and that I’d be better off buying them from a store. Yeah, mom, I’m pretty sure I can’t just go down to Walmart and buy Mulan gloves.

Turns out my mom was probably right. I could have totally just bought a pair of black gloves and added on the parts I needed. Not that I’m ever going to admit that to her. But anyway, I started out by making a pair of basic black gloves using the Butterick B5695 pattern.   I actually had to do this twice because the first set was made out of the same vinyl I used to make the rest of the costume and had no stretch. I could barely fit my hands inside them, so I had to start over with a scrap of pleather I used on another costume that Joann’s doesn’t carry any more. It had some stretch, so it saved the day.


I then added a long wide cuff and some decorative touches in red. I won’t bore you with all the details on how I did that. It was time-consuming and while the process was fun to me, it’ll be tedious to explain. Once again, I failed to take any pictures while making these, so I only have a picture of the almost complete gloves.

image

Now I only have to make the little triangle things and apply them before these gloves and most of the costume will be finished. I won’t say I’ll be done in a week because that would again probably be a lie, but I do think I’m nearing the end of this project.   Read the rest of this entry

When Once Isn’t Enough

Standard

It’s that time of year again when DragonCon prep takes over all my spare time. Despite the lack of posts on this subject, I’ve been busy working on a couple of costumes. This year, I’m making two Mulan costumes. Yes, two.

It’s not that I have a particular affinity for the Mulan character (although she IS the most awesome Disney Princess). Last fall, when the Mulan character showed up on Once Upon a Time, she had this gorgeous quilted leather armor with lots of metal details, and I just knew I had to make that costume.

mulan-once-upon-a-time1

Then, a few weeks ago, my friends and I decided on doing post-apocalyptic Disney Princesses as a group costume. So, of course, Mulan was the obvious choice for me.

The post-apocalyptic costume is about 95% done. Of all the Disney Princesses, I’d say Mulan has one of the least distinctive costumes. Unlike the other Princesses, she wears several outfits during the movie. I decided to base my costume off of the following outfit mainly because I liked the color combination:

I decided to make a simple underbust corset instead of the obi (or whatever the Chinese equivalent is) and shorten the skirt. I also went with more muted colors, this being post apocalypse and all. I’ve done a horrible job of documenting my work this year, so I have very few pictures of the work in progress. This is the completed corset:

20130525_090309

And here’s a horrible picture taken just after midnight of the whole ensemble:

20130526_214314

The skirt is just a rectangular piece of fabric folded and pinned, and the top was sewn in about 20 minutes. The beauty of making a post-apocalyptic costume is that everything is unfinished and rough! I think I may go a different route for the red belt. I also still need to dirty and rip the outfit some and find some accessories, but other than that, I’m done.

The OUAT costume is taking much more time. I started with the shoulder piece, which has been a complete nightmare. In order to get the textured looked, I first thought I’d make it out of crumpled paper. The paper had just the right texture until I started to paint it, and it also didn’t lay correctly, so I scrapped it.

IMG_1357

I then tried craft foam which I painted with gold acrylic paint mixed with a texture medium.

IMG_1361

IMG_1364

Once that dried, I brushed over the gold paint with black paint using a stiff bristle brush making sure not to get too much paint into the crevices. I’m still not entirely happy with the result, but I think it’ll be good enough. Sewing the collar on has also been a pain, and I still haven’t figured out how to get it to lay correctly, so I’ve moved on to other parts of the costume and will get back to this later. I also thought I had some pictures of my progress on this, but I don’t. I’ll post them as soon as I can.

The chest piece, which I thought would be the most difficult, turned out to be fairly simple to make. I started by wrapping myself with masking tape (much easier to work with than duct tape!) over  a plastic bag to make my pattern. I’d never sewn a quilted design in anything before, so this was actually a lot of fun.

20130607_200703

I hate when I forget to turn off the flash!

20130607_210841

20130607_200802

I used the same techniques to make the bottom flappy thing (I have no idea what it's called). I used a pin to mark out my pattern.

I used the same techniques to make the bottom flappy thing (I have no idea what it’s called). I used a pin to mark out my pattern.

I think in the actual costume, the red pieces are sewn in, but I couldn’t figure out how to do that without driving myself crazy. I decided to paint them in instead.

20130615_161618

Iwas able to track down the antique two-tone slotted conchos used in the actual costume.  However, as I don’t have the money to pay $6 PER PIECE for these things, I went the much cheaper route by buying silver-toned ones and painting them. They don’t look exactly right, but for the price, they’ll do.

Before and after gold paint

Before and after gold paint

Finished (L) and prior to antiquing (R)

Finished (L) and prior to antiquing (R)

I finally got to put my Bedazzler to use (I got it on sale, okay?) in attaching the studs between the conchos.

I finally got to put my Bedazzler to use (I got it on sale, okay?) in attaching the studs between the conchos.

That’s all I have for now. I should have most of this costume done by the end of the week and will post more then.

Cash Envelope System Wallet

Standard

I’m a fan of plastic. And by that, I mean the kind that fits in my wallet. I rarely ever have much cash in my wallet because unless I’m at a place that takes cash only, my purchase is going on a credit card. I don’t care if I’m just buying a pack of gum. I know that’s not the most financially sound thing to do, but I hate using cash. I think it’s because I always feel like I might need the cash later somehow, and that’ll run out if I use it. The credit card, however, magically lets me use it as much as I want. Of course, I suppose I have to pay the credit card company sometime, but that’s only once a month, and my husband usually does that before I even have to look at the statement, so it’s like I never had to pay for anything! There’s always some grumbling from my husband about how high the bill is, how we need to stop spending so much, blah blah blah, but I just tune that out.

 A couple of weeks ago, though, I was out at dinner with some friends, and a friend of a friend pulled out an adorable wallet with all these little pockets. I asked her where she got it, she explained it was a “cash system” that she’d made based on a tutorial. I looked up afterwards and learned that the “cash envelope system” is a way of budgeting developed or endorsed by Dave Ramsey where you set aside a certain amount of cash for different spending categories and organize them in envelopes. The cash envelope system wallet is just a neat and pretty way to keep all the envelopes together.   

The tutorial for the wallet is sold on Etsy, so I bought one (for the bargain price of only $1.61) and decided to take a stab at making one. I did make some modifications. First, I couldn’t find any oilcloth, so I made the outside cover out of outdoor canvas and the inside out of coordinating cotton prints. I reinforced the cover and pockets with fusible craft interfacing to stiffen them a bit. I decided to give the outside cover a more finished look by giving it a lining and topstitching the edge.  

IMAG0709

IMAG0711

It’s hard to see, but there are 3 card pockets and an ID window here.


IMAG0710

I added a pen holder and two extra card pockets to the top of this side.

One of the biggest modifications I made was making the envelopes removeable. Instead of attaching them directly to the wallet, I attached them to another piece of cotton that I reinforced with interfacing that can be inserted into the two large pockets or removed when I don’t feel like carrying the envelopes. This also eliminated the neccessity of having to have the unsightly stitching on the back spine of the wallet.

IMAG0713

Wallet with envelopes removed

IMAG0712

Envelope insert

I’ve been using the wallet itself for about a week now, but I still haven’t used the envelopes. That would require sitting down an actually coming up with a budget. Good thing I made the envelopes removeable!

Checking in

Standard

I decided to write this week’s post in my other pretty much abandoned blog about faith. I just wanted to reference it here so that some of my Jesus group friends who sometimes peruse this blog could see that post. Thank you, ladies! I can’t express how much joy and clarity you bring to my life.

Cringe

Standard

So, I resolved to not be such a complete slob at home, and it has now become clear that I really need to extend that to my car as well. On the homefront, things have actually been going fairly well. The countertops and kitchen table have stayed mostly clutter-free, and the laundry room and pantry have stayed organized. Sure, there is clean laundry in the living room that needs to be put away, but all the dirty clothes had been making their way to the hamper until yesterday when my children and their cousins decided to scatter the clothes all over the bathroom floor in an attempt to climb inside said hamper during a game of hide-and-seek (Note to self: set better groundrules next time the kids have a playdate).

Back to the car, though. About once a month, my office has a birthday lunch, and we all go out to eat. I usually try to catch a ride with someone else or make up some other excuse so that no one sees the inside of my car. Last Friday, though, I was caught off guard when one of my co-workers asked me for a ride. I couldn’t think of an excuse fast enough, so I agreed and instantly went into a state of panic. You see, my car is a total and complete wreck on the inside. There are always toys, jackets, empty Happy Meal boxes, juice boxes, snacks, wadded up napkins, and sometimes even a petrified chicken nugget or french fry on the floorboard. And I can’t blame it all on the kids. There are usually also receipts and junk mail and empty containers and cups from my own meals. It’s disgusting. I try to clean out the big trash every week or so, but that still leaves all the crumbs from the countless meals that get dropped on the floors.

IMAG0684

And this is after it was straightened up a bit on Saturday.

I thought about running down ahead of time to see if I could straighten it up a bit, but (maybe keeping with my resolutions to be more honest and not care as much about what others think) I didn’t. I’m a slob, and I should feel the shame that comes with that instead of trying to hide it. He, of course, was very gracious about it and assured me the car was fine (while sitting atop some junk mail I had left on the passenger seat), but I knew better.

So, I need to add another resolution:

16. Keep my car in such a state that I won’t be completely embarassed next time I have an unexpected passenger.

Resolutions

Standard

OK, so it’s already seven days in to 2013, but it’s still the first week of the year(barely), and it wouldn’t be me if it didn’t take me an extra long time to get around to things. So, I’m making my list of resolutions. I make them every year, and, inevitably, I lose sight of them a month or so in. I think I’ve discovered why, though. I’m really bad about underestimating how much time and effort it takes to do things. Or, more accurately, I OVERESTIMATE what I can do. So, the first thing on my list is to be more honest. Not only to everyone else but to myself. I need to realize that there are just certain things I won’t do–at least not without the right motivation. I’ve always been a bit scatterbrained and easily distracted, so I have to do things like give myself deadlines, make lists, break up projects in to small portions. Lofty, nebulous goals don’t work for me. I need a plan with concrete details. So, I’m going to try to come up with a list of goals that are measurable, or, if not measurable, come up with ways to achieve the goal.

1. Be more honest with myself and others. OK, I can’t really think of a concrete way to make that happen or a way to measure that. I suppose making this list will be an ongoing project.

2. Get fit and healthy. I got down to my goal weight back in July, and I’ve put almost 10 pounds back on. I got into that mindset where I thought I could just “maintain” after I lost the weight, but apparently eating whatever I want is not “maintaining.” So, I’m going to try changing my lifestyle instead.  I’m going to a)  limit myself to fast food no more than twice a week (I know it’s still a lot, but I’ve gotten into a bad habit of eating fast food when I’m out running errands with the kids); b)  incorporate vegetables into every meal I cook; c) take the stairs at work; d) get at least some exercise three times a week.

3. Read 52 books.

4. Blog once a week.

5. Finish every craft project I start.

6. Spend more quality time with my kids. I will a) set aside at least 10 minutes of special time with each child every day; b) have a mommy/son date with each child at least once a month.

7. Not be such a complete slob at home. Seriously, I’m a complete slob. I can keep my office passably neat at work because, well, it’s work, and I kind of want to keep my job. But my home is always a mess. The kitchen table and countertop are always piled with junk, there are always toys and clothes strewn all over the floor all over the house, and there are almost always dirty dishes in the sink. I’ve definitely gotten into high gear with this one, though. I’ve spent the last week or so cleaning and organizing room after room in the house. The hard part is going to be finding a way to motivate me and my family to keep it up.

 8. Not care so much what others think about me.  (Maybe that’s part of the honesty thing?)

9. Really work on my faith. It’s something I’ve been struggling with the past couple of years, and with the help of some wonderful friends, I’m starting to find my way, but I still have a long way to go.

10. Pay off a bill.

11. Do some traveling! The traveling bug has bitten me bad. I want to go. Anywhere. A foreign country would be preferable, but I’ll take any place exciting.

12. Be a better wife. It seems that in trying to find time for work and parenting and myself, I sometimes forget to carve out time for my husband. (Why am I starting to notice a pattern of needing more time for everything I want to accomplish here?) 

13. Be a better friend. I need to stop making excuses for not spending enough time with or for my friends. 

14. Be a better listener. That would probably help out with the above two things.

15. Be more generous.


Homemade for the Holidays

Standard

It seems that every year the list of people I have to give gifts to grows longer, yet my gift budget stays the same.  And, every year, drunk on Thanksgiving decadence and holiday cheer, I come up with my brilliant plan to stretch the gift budget by making half of my gifts. Inevitably, I spend the next several weeks frantically researching blogs for inspiration, scouring craft stores for supplies, staying up all hours of the night cutting and gluing and sewing and beading while my projects slowly creep onto and take over all available surfaces of my house, driving my husband insane. I usually finish the season asking myself why I did all that and swearing to go retail next year. Of course, Thanksgiving rolls around again, and the cycle repeats itself. It’s like a Christmas curse.

This year, I thought I had finally broken the cycle. It was well past Thanksgiving, and while I had not purchased a single gift, I still had no crafty inclinations. On December 8, though, I was checking my Facebook updates when I was reminded that Hanukkah was starting and I now have four Jewish relatives. My sister-in-law shocked my very Catholic family last year when she announced that she and three of my brother’s and her four children were converting to Judaism. Last year was the first year they celebrated Hanukkah instead of Christmas, and while we’ve all learned a lot about Judaism since then, I somehow completely forgot to factor in Hanukkah when I thought about my gift-giving timeline this year.

Scrolling through all the Hanukkah posts, I saw one from a Jewish friend about “awesome and unexpected menorahs.”  There was an adorable felt menorah that just jumped out at me, teasing me with its perceived ease of fabrication.

A felt menorah (even kids can light it because there's no actual fire):

$60 on Etsy!

I ran to my scrap pile and found I had plenty of felt to work with. The process was fairly simple. I needed a half circle for each “candle,” so I used two different sized plates as my pattern and cut circles out of freezer paper to reinforce the felt. I then ironed the circles on to the felt and cut the felt the same size as the paper.

002

Once I had four small circles and one large circle, I cut each circle in half.

003

I then sewed a zigzag stitch along the edge of each semicircle. I sewed  a button in the center of the straight edge of each semicircle and finished by folding the circle into a cone and securing with adhesive hem tape.

I found the simplest way to make the flames was to first cut out the inner flame, baste it to the felt I was using for the outer flame, and then sew in the buttonholes. Once the buttonholes were sewn in, I cut out the larger flame shape.

004

After a few hours, I had a menorah that, admittedly, is not as awesome as the original but not bad for what I had on hand. I love spontaneous projects. There’s just something extra magical about making something out of practically nothing.

009

Of course, I learned the next day that this isn’t a kosher menorah, but it didn’t matter. I had once again been hit by the Christmas crafting curse. I’ll write more about my other gift projects if I ever get out from underneath them.

Space Man

Standard

Remember that space man costume I started making for my son a few months ago? No? Well, my son thought I’d forgotten about it, too. He said this morning, “MOM, you’ve been working on my costume for YEARS! I wanted to wear it LAST Halloween!”  I know I’ve been a little slow on this project, but I’m pretty sure it hasn’t been that long (OK, I just looked at my post on it. It was mid-July, which is further back than I thought it was, but not as long as my son thinks it was.).

Anyway, I started working on it again a few weeks ago (on and off, admittedly), and it’s morphed a bit from what it was initially supposed to be. I learned about  electroluminescent (EL) wire  a few months ago, and I’ve been dying to try it out. It’s basically a lightweight, bendy wire that’s fairly cheap and a great way to light up a costume (think Tron). Well, every space suit can use some hi-tech-looking lights, so I thought this would be my perfect opportunity to try it out.

I ordered two nine-foot strands of EL wire in blue and green with controllers from a seller on eBay for $9.88 each including shipping.  They weren’t fancy but seemed to work fine once I installed two AA batteries in each one.

Attaching the wire was easy if somewhat time-consuming.  I made a black jumpsuit as the base to the costume, and I drew a design in white chalk on it where I wanted the EL wire to go. Once that was complete, it was just a matter of hand stitching the wire to the costume with transparent thread. I tied the thread off at every turn in the design.

I went into a bit of a panic when after hours of sewing in the green wire found that it no longer lit up. I started fidgeting with the wire and controller to see where the problem was when the EL wire just completely FELL OUT of the connector. Luckily, my husband who can be handy when he wants to be (or, in this case, coerced) was able to reattach the wire , and it seems to be working just fine now.

Not pretty, but fixed.

I debated whether to hide the controllers inside the suit, but I thought they’d look fine attached at the hips to look like weapons of some sort on a holster. The controllers came with a clip on the back, so I sewed one flat strip of elastic that the clip would hang on and another strip above and one below that strip that went around the outside of the control box.

I have to say, I think Cael is going to be the coolest trick-or-treater in town on Wednesday. I hope he thinks it was worth the wait.

Finn approved after careful inspection.

Look at that pose. He is SO going to be a cosplayer some day.


The suit looks even better in the dark/semi-dark, so I’ll have to see if I can get pictures of that posted soon.